Switching to Graphics Mode - Kernel_Development - Part 11

What we will do now, is to enable the graphics mode in our kernel so we can draw pixels individually. This will allow us to use custom fonts in our kernel, to draw GUIs, images, icons and much much more. The way we are going to switch is by using the VESA video interrupts in the BIOS.
About VESA
VESA is a standard - currently at version 3 -, that defines the interface that can be used by software to access compliant video boards at high resolutions and bit depths. Source.
We will be using the VESA BIOS Extensions available for us to use in real mode through the interrupt 10h. We will also be doing it in a way that could be considered “obsolete” (as we will do it as it was made in VBE 1.2) but this is the easier way to do it and I want this guide to be as simple as possible.
If we were to do it the most updated way - and basically, the way it should be done - we should have a V86 monitor (so we can do it in C, so it’s easier), test all the available modes there are and choose the best for the monitor. Also, it’s important to note that this VBE system is very simple, in production kernels, you shouldn’t use VBE but driving graphics drivers instead, which is much more complicated.
Switching to Graphics Mode
As mentioned before, in order to switch to graphics mode we should be in Real
Mode, therefore, we should perform the switch in our boot.asm file, instead of
our kernel.asm one.
The first thing we are going to do, is to actually switch to graphics mode, we
will do it after we initialise the registers and we will be using the interrupt
Int 10/AX=0x4F02. As you can see, that
interrupt takes two arguments, bx and es:di. We will set bx to the mode we
want to set and we won’t set anything to es:di as we won’t be using VBE 3.0+.
The following is a list of VBE video modes, choose the one you want your OS to be:
| Graphics modes | 320x200 | 640x400 | 640x480 | 800x600 | 1024x768 | 1280x1024 |
|---|---|---|---|---|---|---|
| 16 bit | 0x102, 0x106 | 0x104 | 0x106 | |||
| 256-color | 0x100 | 0x101 | 0x103 | 0x105 | 0x107 | |
| 15-bit | 0x10D | 0x110 | 0x113 | 0x116 | 0x119 | |
| 16-bit | 0x10E | 0x111 | 0x114 | 0x117 | 0x11A | |
| 24-bit | 0x10F | 0x112 | 0x115 | 0x118 | 0x11B |
Note: It is also important to mention, that it is a very bad practise to assume a monitor’s resolution.
In my case, I will choose 0x118 (which is 1024x768:24). So the interrupt call would look like this:
	mov ax, 0x4F02
	mov bx, 0x118
	int 0x10
Now if you compile your project again, and execute it, you will see the the QEMU
window size is now 1024x768 and the screen is cleared. There is one more thing
we have to do, we have to query the VBE, what does it mean? We will call another
interrupt that will return a structure to a specified memory address containing
a lot of information about the video mode we are in, and the framebuffer address
itself, that is, the memory address where we will write our data to. That
interrupt is the 0x4F01, as you can
see it takes two parameters: cx containing the mode we will be using and
es:di the memory address where we want our data structure to be in. We already
know we will be using the 0x118 mode, so we can make call this interrupt like:
	mov ax, 0x4F01
	mov cx, 0x118
	mov di, ?
	int 0x10
That call will return the information of the 0x118 VBE mode into the ?
address, but… why is there a question mark? It’s so simple, because, there we
need to specify a memory address, but how do we know what memory address we can
store this data in? So simple, if we go to
osdev, we can see there is a table
containing a lot of addresses and they give us information about them:
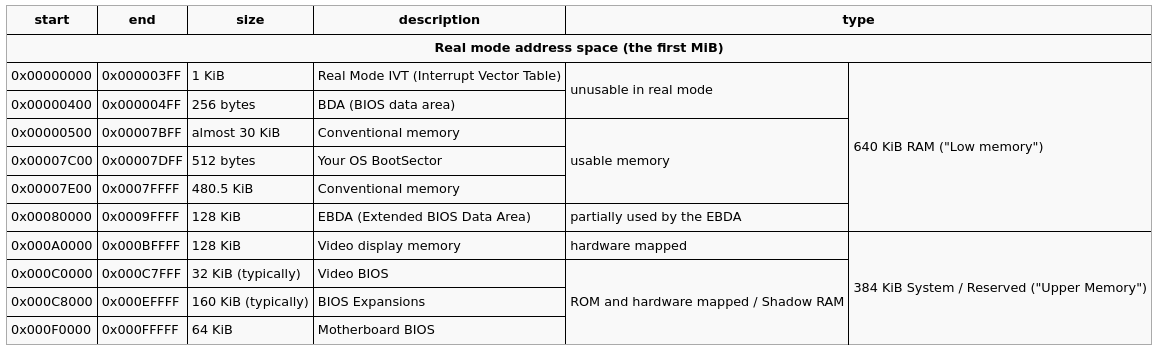
As you can see, in the usable memory section, there are three memory spaces, the first Conventional memory which is almost 30 KiB in size, there’s our OS BootSector, which is, obviously 512 bytes and finally, there’s another Conventional memory which is 480.5 KiB in size.
We will need a Conventional memory space, where to store our data structure,
it is only 256 bytes, so we can store it in the first memory space that is 30
KiB. That’s why, in di we can store 0x500 and there our structure will be
stored.
Our final interrupt call, would look like this:
	mov ax, 0x4F01
	mov cx, 0x118
	mov di, 500
	int 0x10
If you compile your project again, and run it, there shouldn’t be any problems now.
Accessing the VBE data
Now that we know that our VBE data structure is stored in 0x500, now we have to
access it, before that, let’s first create a new folder called drivers/vesa
where we will store all our kernel’s graphics-related functions.
In your Makefile add -I. to the INCLUDES variable, as it’s much cleaner to
do:
#include <drivers/vesa/vesa.h>
Rather than:
#include <vesa/vesa.h>
And in the vesa folder, create a header file called vesa which will contain the
vbe_info structure and all the other function declarations. As usual, add
header guards to the vesa header:
#ifndef __VESA_H
#define __VESA_H

#endif
And there, add the following structure:
struct vbe_info
{
  u16 attributes;
  u8 window_a;
  u8 window_b;
  u16 granularity;
  u16 window_size;
  u16 segment_a;
  u16 segment_b;
  u32 win_func_ptr;
  u16 pitch;
  u16 width;
  u16 height;
  u8 w_char;
  u8 y_char;
  u8 planes;
  u8 bpp;
  u8 banks;
  u8 memory_model;
  u8 bank_size;
  u8 image_pages;
  u8 reserved0;

  u8 red_mask;
  u8 red_position;
  u8 green_mask;
  u8 green_position;
  u8 blue_mask;
  u8 blue_position;
  u8 reserved_mask;
  u8 reserved_position;
  u8 direct_color_attributes;

  u32 framebuffer;

  u32 off_screen_mem_off;
  u16 off_screen_mem_size;

  u8 reserved1[206];
} __attribute__ ((packed));
That structure is 256 bytes in size and contains several items that we won’t be
using as they are deprecated, the only ones that should interest us are pitch,
which contains the number of bytes per horizontal line, the width and
height, which are basically the resolution of the mode we set, bpp that are
the bytes per pixel and finally the framebuffer, which is the physical address
of the frame buffer, we will write to this address to draw things to the screen.
As you can see, there are several errors, specially with undefined references to
datatypes we haven’t implemented yet, go to your kernel.h file, and add the
following typedefs:
typedef unsigned char u8;
typedef unsigned short u16;
typedef unsigned int u32;
typedef unsigned long long u64;

typedef char i8;
typedef short i16;
typedef int i32;
typedef long long i64;
Those are basically typedefs of ints of different sizes. The u prefix means
unsigned, and the i prefix, means they are signed. Now, include kernel.h in
your vesa.h file and now all those errors should be gone.
Now, create a vesa.c file in your vesa directory, include the vesa.h file,
and add this new file to the Makefile. I’d recommend you doing something like:
OBJS=normal files to be compiled

# Vesa Driver
OBJS+=drivers/vesa/vesa.o
So there won’t be that many files in one line, and personally, I think it looks much cleaner.
In the vesa.c file, create a pointer variable of type vbe_info and
call it info (or whatever you want to call it) and initialise it to be 0x500:
struct vbe_info *info = (struct vbe_info *)0x500;
That structure will be used throughout this file several times to do drawing.